What's a Facebook Pixel
Simply put the Facebook Pixel is a little snippet of coding you place on your website which helps Facebook Track people who come to your website.
With the information collected you are able to target people with ads on Facebooks Platforms that will be most interested in your offer.
With Facebook’s advertising AI you can also find people who are similar to people to ones that have visited your website in the past.
By targeting those kinds of people you are more likely to appeal to them and in doing so sell more products or promote your services better.
Do I need the Facebook Pixel on my website?
Simply put if you are planning on building a website to sell products, promote services, promote a business or anything really, then yes you will need a Facebook Pixel.
By installing it on your website from the very beginning you are able to collect every possible clients information.
The more information Facebook is able to collect the better demographic they can create.
This is great news for you as after a while you are able use that power when advertising on Facebook or Instagram.
How to check if I have a Facebook Pixel on my website?
If you know you don’t have a pixel installed yet it is still important to go through this step to see in the future if your Facebook pixel is working properly
Start of by either typing in Facebook Pixel Helper in google and installing a chrome extension.
Or just click the link below.
https://chrome.google.com/webstore/detail/facebook-pixel-helper/fdgfkebogiimcoedlicjlajpkdmockpc
Once you install the extension in chrome you will be able to see it in the top right corner of your browser.
Where to find my Pixel?
To get a Pixel you will have to start off by registering your business on Facebook by creating a Facebook page.
In google type in Facebook Business Manager
or click the link below
https://business.facebook.com/
Once there go through the process of creating a page for your business.
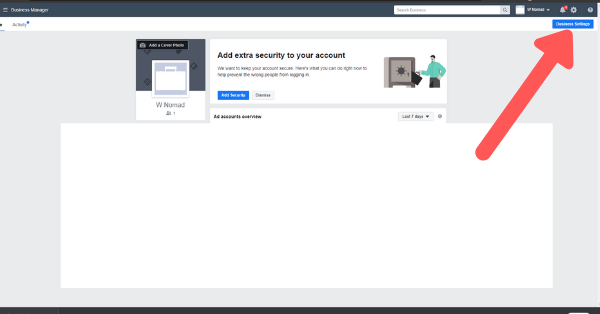
Once you create a Business page on Facebook click on the Business Settings in the top Right Corner.

In the new window in the left hand column
1. Click on Data sources
2. Followed by clicking Pixels
Data Sources > Pixels
1 Next just click Add
2. Once you do you will go through the process of creating a Pixel
Give your Pixel a easy to identify name. Could be your business name or domain name
Next type in your website domain.
for example: wnomad.com
You don’t have to use the http:// or https://
Installing a Facebook Pixel on WordPress
Once you create the Pixel you will be shown a few options where you can manually install the code, send it to a developer or add code using partner integration.
Seeing as you are using WordPress the best option will be to add code using partner integration.
Once you click through a page with all Facebook partners will open up.
Scroll down the page until you find Facebook and click on it.
Next another pop up will appear in which you will have a step by step guide on how to download and install the Official Facebook Pixel plugin for your website.
It will guide you through the whole process…. But so will I.
Make sure that Advanced Matchmaking for WordPress is on and then click the continue button
On this page you will download a plugin that you can install directly on your WordPress website.
1. Click the Download Button and wait for the plugin to begin downloading
2. Click the Continue button
Now it’s time to go back to your website and log into the WordPress Dashboard
You can do this by simply typing in yourdomain.com/wp-admin
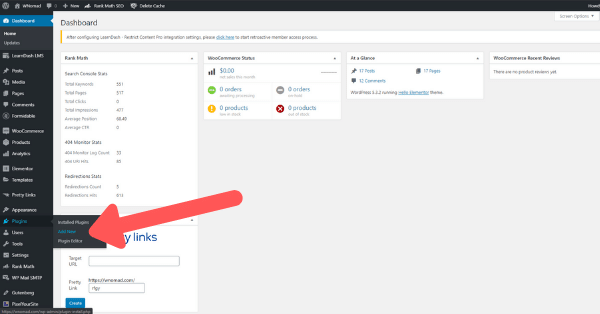
Once you log in go down to the plugins section and click Add New

1. Click the Upload Plugin option
2. Click the Choose File and select the plugin you just downloaded or drag and drop the Facebook Pixel Plugin into this box.
3. Click the Install Now option to install the Facebook Pixel
Once your plugin is uploaded it will prompt you to activate it to make it work on your WordPress Website.
Active it and then you are almost done.
Go back to Facebook and click though all the options to see if your Pixel is installed and you are done.
Remember from earlier you have installed the Facebook Pixel Helper on your chrome browser (I recommend using Brave Browser).
Now if you go back to your domain and click on the helper you can see if it is properly installed on your website.
Sometimes it might take a few moments to register so just make sure to refresh a few times.
Conclusion
And there you have it.
Installing the Facebook Pixel can be a bit of a hassle but if you are thinking of doing Facebook Ads then this is a necessity.
By installing the Facebook Pixel you are collecting valuable data for your facebook ads which in the long run could make them reach just the right demographic.
In doing so helping you convert better and sell more.
If you found this article helpful in anyway please comment below and while you are at it, please share this article with others.


