When you first start using WordPress there definitely is a learning curve to it. From building a theme to optimizing your website with plugins, to the WordPress dashboard itself.
It just seems to be so much stuff to learn and it definitely can be quite daunting.
Luckily for you I’m here to explain to you step-by-step what everything in the dashboard is about and provide you with tips to get the most out of your website.
If you still haven’t built website make sure to check out this article on how to build your travel blog which will guide you through all the steps to get your basic website started.
How to Log Into Your WordPress Dashboard
So the first thing to take into consideration is how to log into your WordPress backend.
The thing I love about WordPress is that you can log into your website from any device anywhere around the world. Seeing as it is a web-based content management system it is a huge benefit.
Besides logging in anywhere in the world on any device of your choosing you get options to also update and install new plugins with out having the need to upload them from your own device.
Which makes it so easy and flexible to run this content management system. Obviously there are others very similar to this but when you consider that WordPress is mostly free besides your hosting and domain name it is extremely good value.
So let us get straight into it and log in to the backend of your website.
It’s as simple as typing in /wp-admin after your domain name.
For example:
https://yourdomain.com/wp-admin
By typing in just that you are able to get the login screen where you type in username and password.
WordPress Dashboard
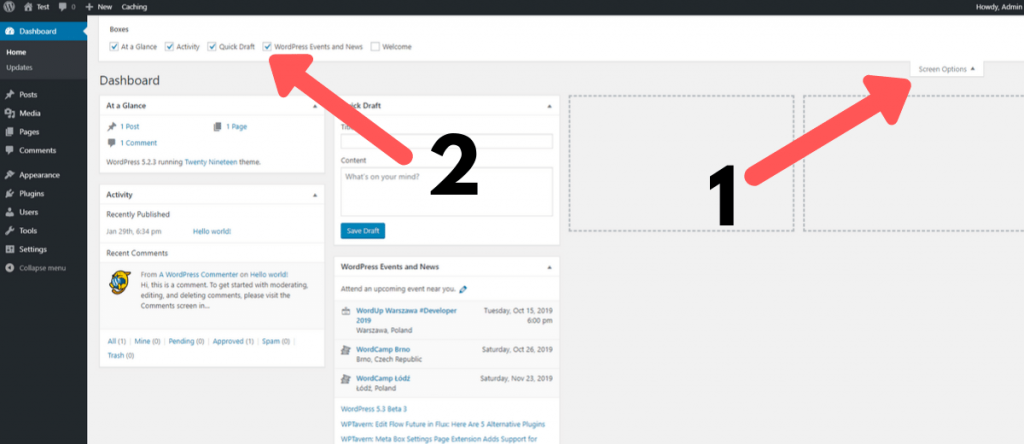
Once you log into the backend you end up in the WordPress dashboard.
This is a place where you can see quick statistics, news about WordPress and in the future when you install more plugins some of them will have a quick display widgets in this section as well.
Think of it as a smartphones front page where you can install widgets of the apps that you want to take quick glances at without actually having the need to open any apps.
If you want to change the layout it’s a simple drag and drop option which allows you to move everything around to your preference.
1. If you’re planning on removing some of the widgets simply click on “Screen Options” Tab in the top right corner
2. Once it drops down just un-select or select the widgets you would like to be visible on your WordPress dashboard
WordPress Topbar and Sidebar
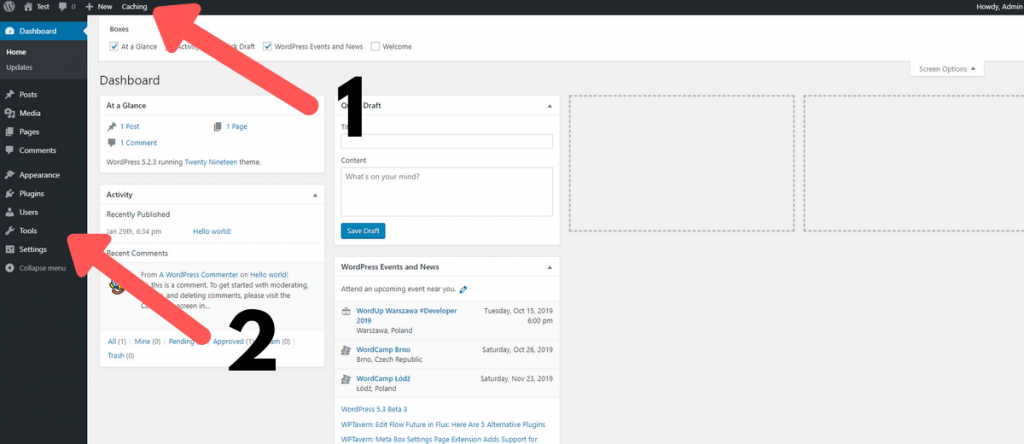
1. One thing to take note of is that there is a top bar which will be available on every page from now on, whenever you are logged into WordPress.
Not only in the back end of the website but also when you are on the front end as well.
***Please note that this bar is only visible to people who are logged into the website, so you don’t have to worry that someone else can edit your pages.***
This is really awesome because it allows you to quickly edit the most important things on your website, no matter which page you are on.
2. The left hand sidebar is only available in the backend of the website.
Here you have all the options to edit your blog and in the future when you install more plugins you will find them in this section as well
What's on the Topbar?
As mentioned before the topbar is visible on all the pages of the website, only when you are logged into your WordPress site.
With this option you can easily edit your website from any page.
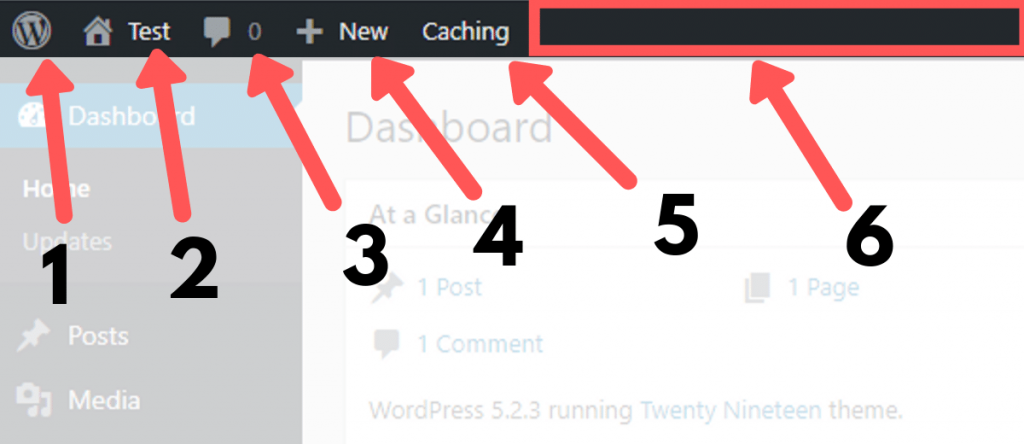
The topbar that I’m displaying is a bare minimum topbar and it can look completely different for you due to the fact that you might have more plugins installed on your website or you are viewing it from the front end of your website.
I will quickly go over all the options on this bar
1. WordPress News – In this drop down you will be able to read about WordPress, it’s documentation and more.
2. Your Blog Name – Click this button to visit the front end of your website.
When you are on the front end of your website this button changes its functions and has a few new options in the drop down. Those are quick links to the dashboard, themes, widgets and menus.
3. Comments – Here you can find out if there are any new comments on your blog that require you to check and approve them.
4. New – From the drop down you can create a new Post, Page or add media (pictures, video etc.) and users to your website
5. Caching – If you have edited or updated your pages and you cannot see the changes come up on your website click this button to purge the website.
This will instruct the web browsers to re-download the website which previously would have stored a older version to help load the website faster for returning visitors.
This is a standard Caching program that gets pre-installed with WordPress. I would recommend downloading another one as there are many with more options to speed up your website.
6. Free Space – In this section you will see more functions pop up depending on the plugins you install.
On the front end you will get another option which says “Customize“. This is used to Work on the layout, colors etc. of your theme.
What's on the Sidebar?
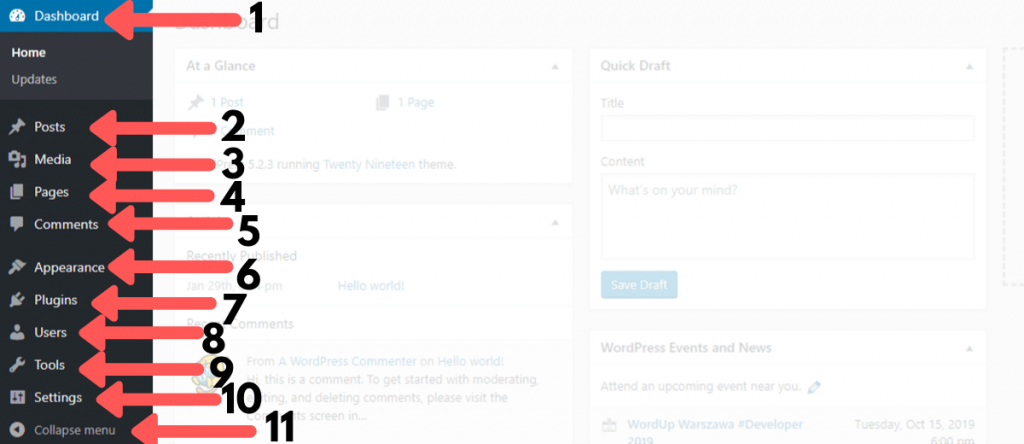
As mentioned before, the WordPress sidebar is only available in the back end of your website.
The WordPress sidebar is in the form of a menu and everything you require to run the website is available in this section.
Please be aware that the sidebar I’m discussing is the very basic one you can get without any additional WordPress plugins.
So if you are looking at a different kind of sidebar that is because you have additional plugins installed on your website already. This is in no way a problem, It just means you have more customization for your website
Let’s get straight into it.
1. Dashboard – The first section is your WordPress dashboard.Here you will find all information you require at a quick glance. This is where the widgets are displayed and if there are any updates you can update them from one simple section.

2. Posts – in this section you will have everything you need to view all your previously written and deleted posts, you have the opportunity to create new posts, specific categories and tags which you can use to organize your posts.
A category is like a folder into which you put specific posts. e.g. If you write about different animals you can have a category for dogs and cats.
By placing them in specific categories you can display all the relevant posts about dogs on one simple page. Making it easier for people to find exactly what they are searching for and having it all in one place.
Tags on the other hand make it simpler to find articles that have similarities to each other.
E.g. You have a category about dogs but write articles about pugs. To make it easier to search for pugs you just add specific tags to each post. This is great for search engines as well as they can easily figure out what each post is about.
3. Media – in this section you will be able to view all your media in a simple and easy to navigate Media Library.
Here you will also be able to add new media, such as Pictures, Video’s and Files
4. Pages – In this section you will be able to create pages for your website.
The difference between pages and posts is that a page is a static piece of content. Such as a contact us page, privacy page, terms and conditions page or a store page. Usually a page does not change very often in fact in most cases it doesn’t have to be updated at all.
Where as a post not only can be edited, but it should be edited in the long run to keep it fresh for the search engines.

5. Comments – In this section you will be able to view all your comments that people have left on your blog posts.
If you choose not to have comments displayed on your blog posts you can disable them using a very simple plugin.
The best plugin I have found for disabling comments is “one click close comments“.
You can add it to your website by downloading it in the plugins section.
In the comments section you also have the ability to moderate all the comments that have been posted. This means if you are receiving spam or unwanted comments from people, you can delete them and ban the accounts from posting more in the future.
6. Appearance – In this section you will have everything you require to change the look and feel of your website, menus and widgets.
You will also be able to install theme’s from the ever growing theme marketplace or upload ones you purchased on premium theme websites.
-Find out more about installing a Theme-
Depending on the theme or plugins that you get, you will have full customization of the colors, fonts, logos, page layouts etc.
In the menu section you can create menus, and change menus adding all he most important pages to it.
You are able to create multiple menu’s as well. This is so that you can have 1 type of menu at the top of your website, or another one for your footer or even a different menu for logged in individuals.
Widgets are added customization options from certain plug-ins and themes that you might install on your website. These may include contact forms, social sharing buttons, most recent posts, polls and so many more.
Depending on your theme you can allocate these in your header, footer, sidebar and within your content.
I recommend the elementor theme as it is super simple, extremely light weight (for fast loading) and most importantly with the elementor plugin you are able to customize absolutely everything you see on the website.
There is a free version you can use which gives you limited functionality, and a pro version which will give you an overabundance of options that will make your website stand out from the rest.
7. Plugins – In this section you are able to check out all the plugins you have installed on your website, you can also activate, deactivate, update and install new plugins.
There is an option to edit a plugin with the plugin editor but I would recommend staying away from this section unless you have previous coding experience or have hired someone who knows what they’re doing.
If you begin tinkering with the coding you might break the plugin or even worse break the website and prevent it from loading properly.
One thing to take into consideration when installing plugins onto your website is to make sure that you do not install too many of them.
The reason being is the more plugins you have on your website the heavier it becomes and the slower it loads for your audience and also for yourself.
My recommendation is finding plugins that allow you to do multiple things or in general just stick to the very basics and if you need more options research the simplest plugins in Google.
8. Users – In this section you can view every person that has created an account on your website. Be it yourself as the Admin, or other users you have granted log in details to either contribute by posting articles or even subscribers to your blog.
If you find the need to add or remove people from your blog then you can do that in this section.
Here you can also tidy up your profile, by adding additional information about yourself such as social networks you are apart of, or website you have. Here you can also change your password.
9. Tools – This will probably end up being the least used section in the menu. Only a few plugins will embed their options in this section. Besides that you are able to export your website and or import other website information in this section.
Great for manual back-up’s but there are plenty of amazing plugins that can do that for you automatically and even better, store your information in the cloud where it is nice and safe.
10. Settings – In this section you can edit the very basics of your blog.
Be it the time and time zone, commenting options, permalinks, discussion options and so on.
I recommend just leaving it as it is as it is already set up to be best for your blog.
And that is all you really need to know about the WordPress dashboard. Obviously as you install more plugins or themes you will find more options in the dashboard section.
This would just give you the option to access all the information and all the settings that you require for each individual plugin.
I hope that this page had helped you navigate the back end of the WordPress and if you have any more questions, please feel free to comment below where I’ll be able to respond to you as soon as possible.
Also if this article has helped you in any way please forward it or share it with others so that they can learn as well.
FAQ's About the WordPress Dashboard
Simply type in your domain name with /wp-admin as your ending e.g. https://yourdomain.com/wp-admin
This will direct you to the log in screen which will require your login information to access the WordPress Dashboard
To install a theme for your website in the WordPress Dashboard simply go to the "Appearance" section. There you will find a themes sub section which will have a "Add New Theme" option.
Your WordPress Dashboard might be slow due to the hosting you have selected or because you have installed to many Theme's and Plugin's which slow down your website not just for you but for your audience as well.

